This article will explain what rules are and teach you how to create and verify them and test them with rule simulation.
A rule in CATCH.AI defines actions to take when certain conditions are met in the reported data.
Rules are used to continually analyze the incoming data and extend the system's capabilities beyond data visualization. This enables you to capture valuable domain knowledge in the system, which can assist the users in their tasks.
EXAMPLE: Using rules for predictive maintenance
In a production line, the technicians wanted to be able to predict when the suction cups of a vacuum picker need to be cleaned or replaced.
To do this they decided to monitor the time it takes between the vacuum being initiated and until it occurred. However, no such timing was available in the device. Instead, they had two signals that showed when the two events occurred.
A rule was set up that monitored the "start" signal and started a timer.
Another rule was set up to read the timer and store the value in the system when the "end" signal occurred.
They now had the timings.
A rule could now be set up to warn the technicians when the timing had increased above a certain threshold multiple times within a period.
With the warning they were able to identify when vacuum cups were about to become an issue and schedule an inspection.
Expression builder
Rules are defined using a built-in expression builder and are structured like this:
"IF the condition is true THEN perform this action"
The rule configurator is divided into three main sections:
- Conditions
- Actions
- Rule Simulation
Additionally, a rule can be Active or not. If the active box (next to Save) is checked, then the rule will be executed when data arrives. Otherwise, the rule will be disabled.
Rule conditions
A condition is the smallest entity in the CATCH.AI expression builder. It describes a single condition for a single data attribute.
A condition is a boolean expression which means that it is either true or false at a given time.
A condition can consist of multiple conditions combined in AND or OR groups. This allows conditions to express situations that span from simple to very complex situations.
A condition group combines multiple conditions with either an AND or an OR operator. The condition group is in principle also a condition. But one that combines other conditions into a single result (true/false).
The rule expression is the combination of one or more condition groups that each contain one or more conditions that are evaluated individually. The expression is in principle also a condition, but one that is the sum of all the conditions. It is the expression that must be true before the rule is triggered.
Using the expression builder
The expression builder allows users to easily create complex expressions by combining multiple condition groups and conditions. It also provides a visual representation of the expression, making it easier to understand and debug.
The picture below shows an expression where the individual conditions and each group is shown:
- Condition group
- Condition
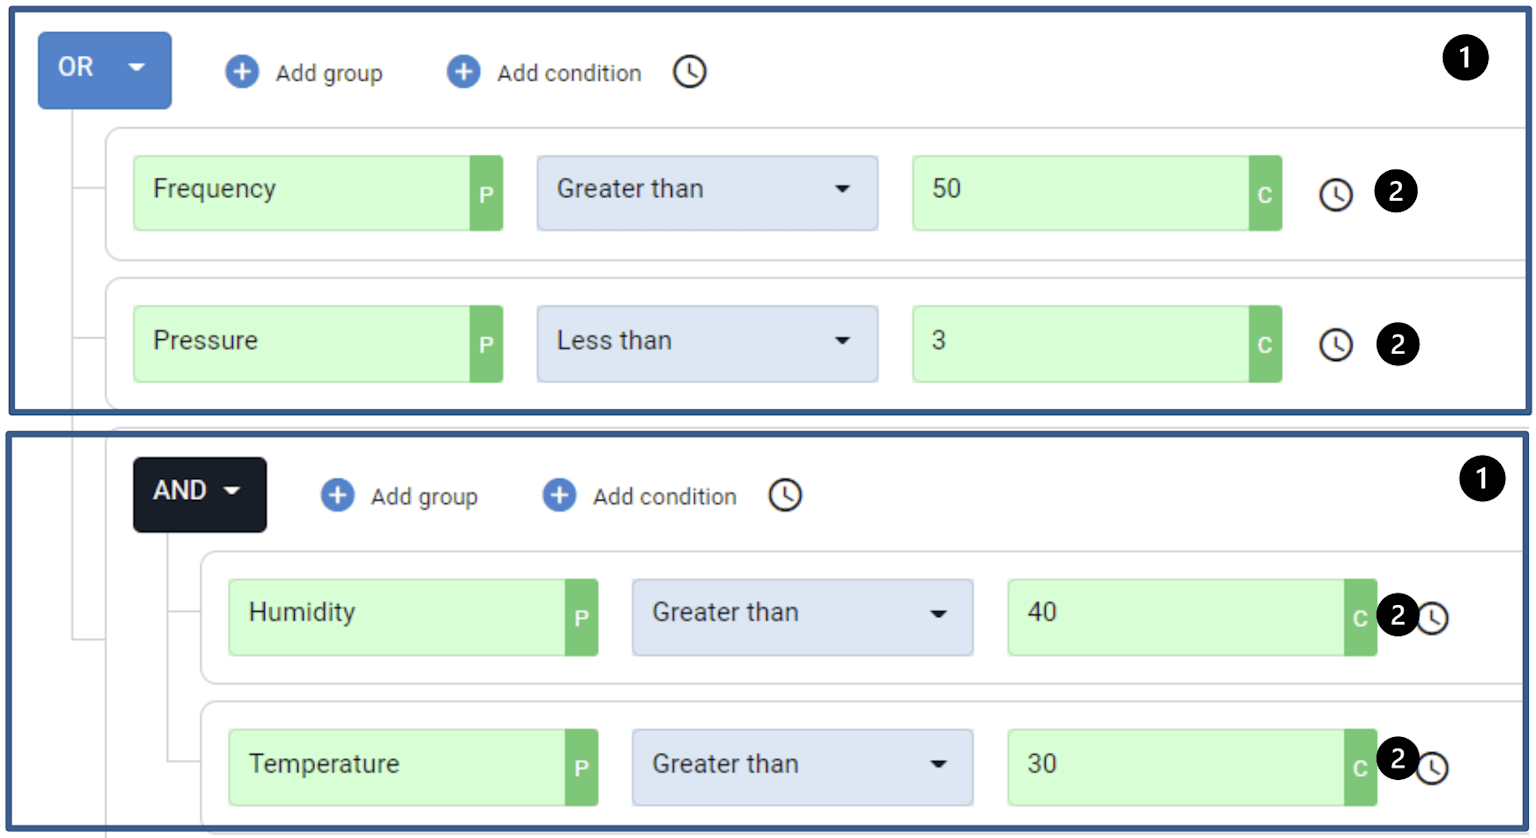
- Frequency is greater than 50
- Pressure is less than 3
- Humidity is greater than 40 AND Temperature is greater than 30
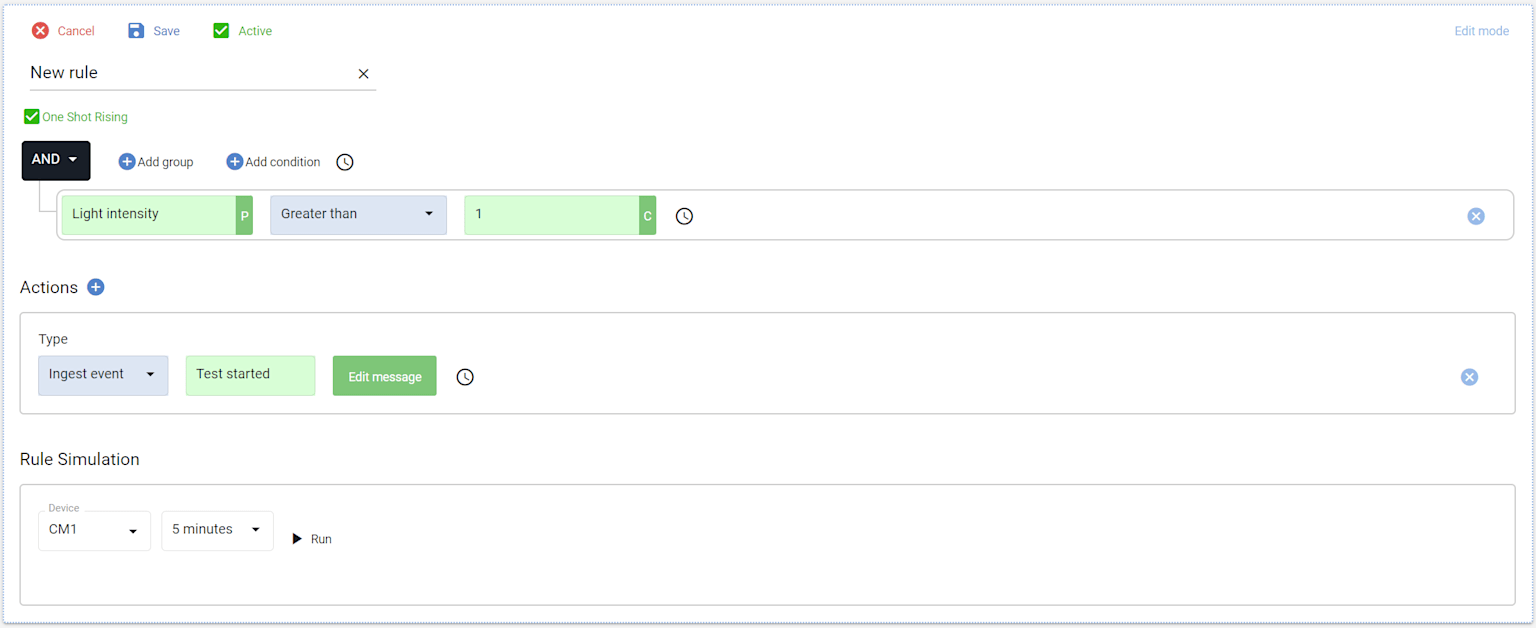
Rules can be configured with the "One shot rising" option active or not.

If "One shot rising" is active, the rule will be triggered once the first time the rule expression is true. The rule expression must then be evaluated as false before it can trigger again. Furthermore, it ensures that data is only considered if it is ordered (FIFO).
If "One shot rising" is not active the rule will trigger every time the rule expression is evaluated as true.
Condition (single)
A condition is a single boolean expression, which is expressed in the structure:
Attribute - Operator - (Optional) Attribute - Time span restriction
For example: Temperature (p2) - greater than - 25 - for 15 seconds, as in the image below.

Attribute
The attributes describe a data attribute. This could be a property, an event, a device ID, a multi-limit result, or a constant.
Operator
The operator is the comparison operator used to evaluate the value of the attribute. The attribute can be evaluated against another attribute. This could be a comparison operator such as greater than, less than, equal to, etc. Or it can be evaluated against itself using an operator such as changes, not changed, rising, etc.
Time span restriction
The time span restriction is an optional parameter that can be used to express that a condition must have been true for a certain time span before being evaluated as true. This can be used to limit the condition to a specific time frame or to limit the condition to a specific number of occurrences.
The time span restriction can also be applied to the condition groups and the full expression.
Condition group
A condition group combines multiple conditions with either an AND or an OR operator. The group operator is selected in the upper left corner of the group.
The condition group is in principle also a condition. But one that combines other conditions into a single result (true/false). This implies that a group can also contain other groups as conditions.


If the group is an OR group, it is true when any of the conditions in the group are true.

Expression evaluation
The expression of a rule is evaluated every time data is ingested into the system, that contains properties or events relevant to the rule.
All rules are evaluated on data coming from all devices. Therefore, it may in some situations be a good idea to add a device ID condition to the rule. Such that only data coming from specific devices can trigger the rule.
It should be noted that the rule is only evaluated on data ingestion. This means that if you have a time span restriction. It will only be re-evaluated when there is data.
Furthermore, the value of a property is assumed to not change between data points.
EXAMPLE
You have a rule that checks if the temperature has been greater than 25 for more than 10 seconds. You sample every 30 seconds and get the following data:
- At time 12:00:00 you receive, Temperature = 10.
- At time 12:00:30 you receive, Temperature = 40.
- At time 12:01:00 you receive, Temperature = 20.
Rule actions
An action describes what the system should do when the condition is true. Actions can be used to ingest data, notify users, or activate other systems. Rules can have multiple actions that are performed when the rule is triggered.
You add an action by pressing the "+" button next to actions. From here, you need to select the action type. This changes the fields that you can configure for the action. Some actions can carry a message, some you will need to specify an event or property, etc.

For all actions, you can also set a limitation on it, limiting how often the action can trigger even if the rule triggers multiple times. This can be useful if you are sending e-mails, SMS, UI Notifications, etc.
For example, if you want an e-mail about the trigger maximum once every hour you can put a 1-hour limit on it. Then this action will not be executed for the next hour after the first rule trigger even if the rule is triggered again. However, the other actions in the rule will still be executed.

Action types
| UI notification | Shows a notification in the web interface |
| Send an email to the address specified | |
| SMS/push | Send an SMS or push notification to the phone number specified |
| Ingest event | Ingests an event with a configurable message |
| Push to target | Send a message to another system |
| Change property | Ingest a property value |
| Start timer | Start a timer/stopwatch |
| Read timer | Read a timer and store the value in a property |
| Restart timer | Read a timer and store the value in a property, then restart the timer |
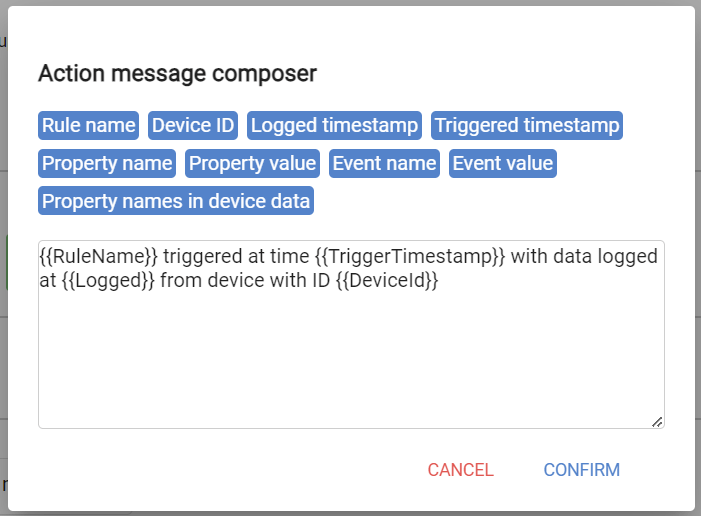
Action messages
Some actions can carry a message. In that case, an "Edit message" button is displayed on the action when in Edit mode.

Pressing the Edit message button opens the Action message composer. From here, you can configure the message that should be sent. The message can be fixed or contain dynamic elements that will be evaluated when the action is triggered based on the data that triggered the action.
Ingesting data
Some actions are able to ingest data into the system. For these actions, you must select a property or event that the value should be stored on. For example, the ingest event action.

Pressing the green Event field opens an event picker with the available events.

Creating a rule
To create a rule start by navigating to the System tab and choose Rule Management in the sidebar.
Once there, click on the 'New Rule' button. This will open the rule configuration in edit mode on the new rule. From here you can enter the details of the rule.
You will need to enter a name for the rule, the conditions that must be met for the rule to be triggered, and the actions that should be taken when the rule is triggered.
Once you have finished entering the details, click the 'Save' button to save the rule.


Test your rule with Rule Simulation
Test that a rule triggers when you expect you can activate the rule and wait for the device to do what you are looking for again. However, this can take a very long time. So instead CATCH.AI comes with Rule Simulation.
The Rule Simulation allows you to run the rule on existing data, from even before the rule was created. You will then be able to see when the rule would have triggered, had it been active at the time.
To run the rule simulation, select a device where the data you want to simulate comes from. Then select a time period to simulate the rule on. Finally, press run.


Tips and tricks
Here are a few tips and tricks from the developers!
- Events can be very practical to find the data you are looking for. Rules can be used to create events that you can use to filter your data.
- Some cases may require multiple rules that work together to describe the situation. For example, using the timing action or counting the number of occurrences using the Change Property action.
- The rule expression is evaluated in chronological order. So if you only want the rule to trigger for a specific device, start the rule with a device condition.
- Having UI Notification can quickly become messy. Consider if you can ingest an event instead and create a dashboard that shows the event values.